Saturday, July 27, 2013

A Visit from the Tooth Fairy

My daughter recently lost her first tooth and the tooth fairy was ready at our house!  I found great ideas on Pinterest and went a little wild:)  The reaction when she saw what the tooth fairy left was priceless.
 Grandma and Grandpa have a fairy door on one of their trees and the kids are very entertained by it.  Once I saw this  I knew the tooth fairy had to leave a door at our house.  This door magically appeared over night when the tooth fairy stopped by to collect the tooth.  It is placed in between the wall that separates the kids' bedrooms, so easily accessible for the tooth fairy to visit either child;)
 Well what did she put her tooth in?
 This cute pouch.  I used the dimensions from this tutorial to make the pouch.  Then I had Grandma (thank you!) sew it together quick and sew on the ribbon so it would loop around the door knob.  I then used my Silhouette and Amy Robison's awesome tooth fairy kit to cut out heat transfer for the pouch and then ironed it on.  The "tooth fairy" then attached a mini key to her door on the ribbon of the bag.  We also used Amy Robison's Lost Tooth Certificate to document the big day.  So much fun!
Since we did my daughter's pouch I went ahead and made one for my son as well, now I just have to hang onto it until he looses his teeth in a few years!

Updated Quilt

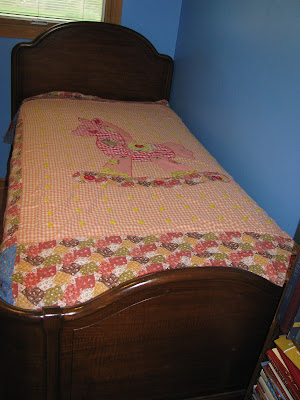
This month Vicki gave an old quilt new life.  Vicki's oldest daughter (Gail!) received this quilt as a gift from her great-grandma when she was little.  It received lots of love over the years and was worn in several places and had ink stains several places as well.  Gail's daughter is having a horse phase so Vicki updated the quilt and gave it to her.  It is currently receiving lots of love again:)
 The quilt before it was updated.
And After.
The horse received a new mane.  The top corner hearts were replaced and extra hearts were added to the body of the quilt.

Bread Basket


A friend of ours just moved into a new house, and we will be going to visit them the first weekend in August and I thought I should make them a nice housewarming present.

I didn't have colored reed that I wanted, so I dyed the reed (and a bunch of t-shirts).  For the dyeing, I filled a stock pot about 2/3rds full or water, then added 1 cup of vinegar, 1 cup of salt, and 1 package of RIT navy dye.  I brought it up to a simmer and started putting stuff in to dye.  It only took about 5 minutes to get a nice rich color into the reed.

Then, I weaved this bread basket.  I let it dry and then I stained it using Early American Minwax stain.  I am so thrilled with how this turned out that I want to make another one to keep....perhaps another month!  I cannot wait to give this to my friends!

Wednesday, July 10, 2013

Tutu Revamp!


I was rehearsing the Esmeralda variation for an August show and have been getting crafty with my ensemble!  I last used my tutu for Spanish-ey Paquita which meant it had all red decorations and lace.  My mom, Vicki, helped me take off all the red and resew two layers of green tulle that is tacked down with green rhinestones.  I also sewed/hot glued a green and black flower for my hair.  Finally, I bejeweled and ribbon-ed my tambourine that I use in the variation.  I completed all my preparations on Sunday night and unfortunately when I walked into the studio Monday morning, I found out the show had been canceled.  However, I hope to still perform it in the fall and (if I remember) will post a picture of the final look here at that time : )

Sunday, June 30, 2013

Rotating Display

This month Allison found a bulletin board with a box on the bottom.  She is a big St. Louis Cardinals Fan, if you couldn't tell by now:)  This is her tribute box to games she has been too.  The box is handy for her to place replicas of her tickets and other memorabilia.  The bulletin board background is an easy way for her to swap out pictures of her most recent visit to the stadium and game.

Thursday, June 27, 2013

Canvas Project with the Kids

I bought a package for skinny 4x4 canvases thinking that we would do this project with the kids for my daughter's birthday party since she requested that they paint.  Ooooh I am so glad I ended up vetoing that idea to pain with a bunch of 4 and 5 year olds! I had the canvases so I thought that we could have some fun with them around the house.
I used my Silhouette and cut out a vinyl unicorn as requested.  My daughter wanted a pink unicorn so I had her paint the canvas all in pink and then let it try.  I then attached the vinyl unicorn and had her paint the canvas again in purple.  After she was done painting we peeled up the vinyl and had this.  She chose some ribbon out of the stash to make it into a door hanger for her room.
My 2-1/2 year old is into trucks, machines, etc.  I had him pick out which machine he wanted to do and he chose a digger.  I stuck his vinyl digger straight to the canvas and let him have a go with the paints.  Once he was done we peeled it up and had a white digger silhouette.  He wanted to be like big sis and picked out some ribbon so we could hang his project in his room.

Fun with Vinyl

 So I had a little fun with my vinyl this week.
 I know I've seen this one somewhere, but can't remember where exactly.  I put this on the tub in our master bath.  The hubby actually noticed it the first day it was up.   
 We repainted all of our main floor and so this kid art display had to come down, along with my vinyl.  So I finally got around to putting up a new "Masterpiece" sign on the wall.  I previously had used a font called FREEZE that I ended up being not too fond once it was cut and on the wall.  So when I recut it I switched it to MY OWN TOPHER font. This display idea came from here and it works great for displaying the kids art.